
Singer 500 Manual: A Comprehensive Guide
Discover a wealth of resources for your Singer 500 SERIES sewing machine‚ including three free online manuals: instructions‚ service details‚ and parts lists.
Unlock the full potential of your machine with guides‚ specifications‚ and a Deluxe-Edition manual for Singer 500/500A models‚ ensuring a seamless sewing experience.
Today’s date is 04/28/2026 04:20:29 ().
The Singer 500 represents a significant piece of sewing machine history‚ beloved by enthusiasts for its robust construction and reliable performance. This machine‚ and its variations like the 500A‚ offers a blend of classic mechanics and user-friendly operation. Understanding its capabilities begins with accessing the appropriate documentation – the Singer 500 manual.
Available manuals encompass a range of needs‚ from basic usage instructions to detailed service information and comprehensive parts lists. These resources are readily accessible online‚ often in PDF format‚ allowing for convenient viewing and download. The manuals are designed to guide users through every aspect of the machine‚ ensuring optimal functionality and longevity.
Whether you’re a seasoned seamstress or a beginner‚ the Singer 500 manual is an invaluable tool. It provides clear‚ concise instructions‚ troubleshooting tips‚ and diagrams to help you master this iconic sewing machine. Don’t hesitate to utilize these resources to unlock the full potential of your Singer 500!
Remember‚ a well-maintained Singer 500 can provide years of dependable service.
Historical Context of the Singer 500 Series
The Singer 500 series emerged as a popular choice during a period of significant growth for home sewing. Representing a shift towards more accessible and user-friendly machines‚ the 500 aimed to bring quality sewing capabilities to a wider audience. Its design reflected the evolving needs of home sewers‚ offering a balance between durability and ease of use;
The availability of detailed manuals‚ like the instructions for using manual‚ service manual‚ and parts list‚ was crucial for supporting users during this era. These documents empowered individuals to maintain and repair their machines‚ extending their lifespan and reducing reliance on professional services. The Deluxe-Edition manuals‚ though rarer‚ provided even more in-depth guidance.
Today‚ the Singer 500 remains a sought-after machine among collectors and sewing enthusiasts. Access to original manuals‚ now often digitized and available online‚ is vital for preserving its legacy and ensuring its continued functionality. Understanding its historical context enhances appreciation for this iconic sewing machine.
These manuals are a testament to Singer’s commitment to user support.
Where to Find the Singer 500 Manual Online
Fortunately‚ locating the Singer 500 manual online is remarkably accessible. Several websites host digitized versions of the instructions for using manual‚ service manual‚ and parts list‚ available for free viewing or download in PDF format. A database currently contains 3 Singer 500 SERIES Manuals readily available.
Sewing Dude Blog is specifically mentioned as a source for the instruction manual‚ repeatedly stating “Not for resale!” as a courtesy. Additionally‚ resources like PDF search engines and online sewing machine communities often share links to these valuable documents. Websites dedicated to vintage sewing machines are also excellent places to search.
For models like the CG500 and HD500‚ manufacturer websites or dedicated model-specific forums may offer downloadable manuals. Remember to verify the authenticity and completeness of any downloaded file. These online resources ensure continued access to essential support for Singer 500 owners.
Always prioritize reputable sources for accurate information.

Understanding the Manual Sections
Explore the Singer 500 manual’s key sections: instructions for use‚ detailed service repair information‚ and comprehensive parts lists for easy component identification.
These resources unlock your machine’s full potential.
Instructions for Using Manual – Overview
The Singer 500’s instruction manual serves as your primary guide‚ offering clear‚ concise directions to maximize your sewing experience. This manual‚ often available for free online viewing or download in PDF format‚ details everything from initial setup to advanced techniques.
It emphasizes a frustration-free approach‚ eliminating confusion with step-by-step explanations. You’ll find guidance on threading‚ bobbin winding‚ stitch selection‚ and adjusting settings. The manual repeatedly stresses it is “Not for resale!” and is often provided courtesy of sewing blogs like Sewing Dude.
Expect to discover how to perform basic operations like straight and zigzag stitching‚ alongside more complex tasks. This ultimate guide empowers you to unlock the full potential of your Singer 500‚ ensuring successful and enjoyable sewing projects every time.
Service Manual – Detailed Repair Information
The Singer 500 service manual is a crucial resource for those comfortable with machine maintenance and repair. Available online as a PDF‚ it provides in-depth technical information beyond the standard user guide. This manual delves into the internal workings of the Singer 500‚ offering exploded diagrams and detailed instructions for disassembly‚ troubleshooting‚ and component replacement.
It’s geared towards individuals with mechanical aptitude‚ outlining procedures for addressing common issues and performing more complex repairs. Expect to find specifications for adjustments‚ torque values‚ and electrical schematics. While comprehensive‚ it assumes a level of technical understanding and should be used with caution by inexperienced users.
Access to this manual empowers owners to potentially resolve issues independently‚ saving on repair costs and extending the lifespan of their Singer 500 sewing machine.
Parts List – Identifying Components
A vital component of Singer 500 ownership is access to a comprehensive parts list. This resource‚ available as a PDF download‚ is essential when replacing worn or broken components. The parts list features detailed diagrams illustrating each part of the Singer 500‚ accompanied by corresponding part numbers.
Accurate identification is key to ordering the correct replacement parts‚ ensuring compatibility and proper functionality. The list typically categorizes parts by assembly – for example‚ motor components‚ needle bar mechanisms‚ or feed dog systems – making navigation easier.
Whether you’re undertaking a repair yourself or ordering through a Singer dealer‚ the parts list streamlines the process‚ preventing costly errors and keeping your Singer 500 running smoothly for years to come.
Setting Up Your Singer 500
Prepare for successful sewing by mastering initial setup‚ bobbin winding‚ and needle threading – crucial steps detailed in the Singer 500 manual for optimal performance.
Initial Machine Setup
Begin your sewing journey with a properly set up Singer 500! The instruction manual emphasizes a clean‚ stable workspace as the foundation. Ensure the machine is placed on a firm‚ level surface to prevent vibrations and ensure consistent stitch quality.
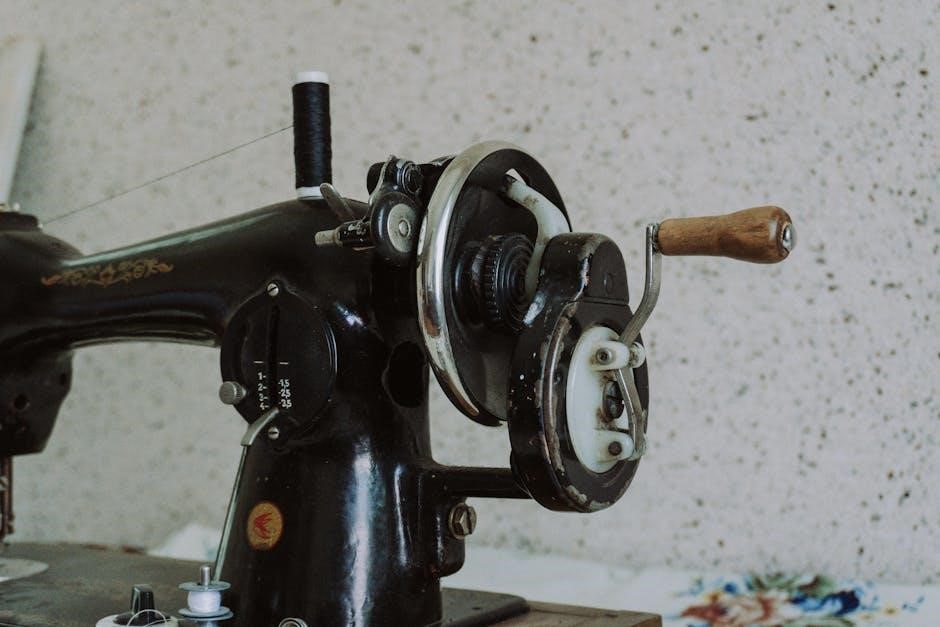
Next‚ connect the power cord and verify the voltage matches your household supply. Familiarize yourself with the key components – the handwheel‚ stitch selector‚ tension dials‚ and presser foot lever – as outlined in the manual.
Crucially‚ the manual details the proper installation of the light bulb‚ ensuring adequate illumination for precise work. Before threading‚ confirm the presser foot is raised; this disengages the tension mechanism‚ vital for correct threading. Following these initial steps‚ as described in the Singer 500 manual‚ will guarantee a smooth and enjoyable sewing experience.
Winding the Bobbin
Proper bobbin winding is crucial for consistent sewing with your Singer 500. The manual illustrates a straightforward process: place the spool of thread on the spool pin‚ guiding the thread through the thread guide. Then‚ thread the end through the bobbin winder tension disc‚ ensuring a snug fit.
Next‚ position the bobbin onto the bobbin winder spindle and push it to the right to engage the winding mechanism. Gently depress the foot pedal to start winding; the manual advises winding slowly and evenly to avoid thread breakage or uneven distribution.
Once the bobbin is full‚ the winder will automatically stop. Cut the thread‚ remove the bobbin‚ and secure the thread end. The Singer 500 manual stresses the importance of using quality thread and correctly tensioned winding for optimal results‚ preventing issues during sewing.
Threading the Needle
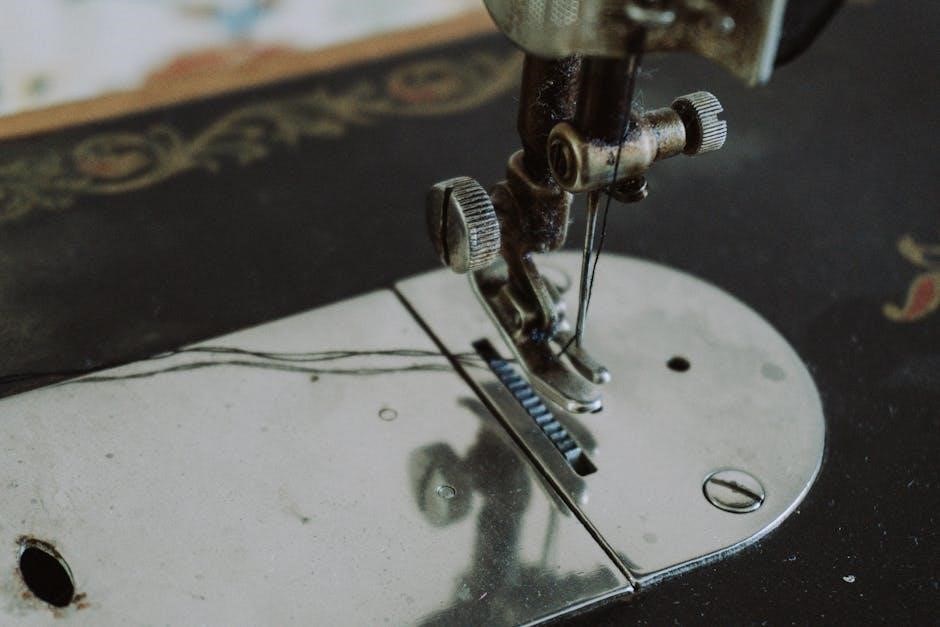
Successfully threading the needle on your Singer 500 is fundamental to beginning any sewing project. The manual details a clear path: lift the presser foot‚ as this releases tension on the thread. Guide the thread from the spool‚ through the first thread guide‚ and then down and around the tension discs – ensuring it seats firmly between them.
Continue by raising the needle to its highest position using the handwheel. Next‚ thread the needle from front to back‚ utilizing the needle threader if needed. The manual emphasizes using a needle appropriate for the fabric weight and thread type.
Finally‚ draw up enough thread to comfortably begin sewing‚ approximately 4-6 inches. Proper threading‚ as illustrated in the manual‚ prevents skipped stitches and ensures smooth operation of your Singer 500. Always double-check the threading path before starting.
Basic Sewing Operations
Master fundamental techniques like straight and zigzag stitching with your Singer 500‚ easily adjusting stitch length and width for varied projects and fabrics.
Straight Stitching
Achieving a perfect straight stitch on your Singer 500 is foundational to many sewing projects. Begin by ensuring your machine is correctly threaded and the bobbin is wound properly‚ as detailed in the manual’s setup sections. Select the straight stitch setting on your machine – typically indicated by a straight line symbol – and practice on a scrap fabric first.
Adjust the stitch length according to your fabric weight and desired outcome; shorter stitches are ideal for delicate materials‚ while longer stitches suit heavier fabrics. Maintain a consistent sewing speed and guide the fabric gently‚ avoiding pushing or pulling. The presser foot should remain flat on the fabric for even stitching.
Regularly check the stitch quality‚ ensuring the top and bobbin threads interlock correctly. If encountering issues‚ consult the troubleshooting section of the manual for guidance on tension adjustments or potential mechanical problems. Consistent practice will quickly build your confidence and skill in creating flawless straight seams.
Zigzag Stitching
Mastering the zigzag stitch on your Singer 500 unlocks a range of decorative and functional sewing possibilities. Begin by selecting the zigzag stitch setting on your machine‚ identifiable by its zigzag pattern symbol. Experiment with different stitch widths and lengths to achieve varied effects – wider stitches are suitable for finishing raw edges‚ while narrower stitches are ideal for appliqué.
Adjust the stitch width using the designated dial or settings‚ observing how it alters the stitch’s appearance. Practice on scrap fabric to understand the impact of these adjustments; Zigzag stitching is excellent for preventing fabric fraying‚ creating stretch seams‚ and adding decorative embellishments.
Refer to your Singer 500 manual for specific guidance on tension settings when using zigzag stitch‚ as incorrect tension can lead to puckering or loose stitches. Consistent practice and careful observation will enable you to confidently utilize this versatile stitch for diverse sewing projects.
Adjusting Stitch Length and Width
Precise control over stitch length and width is crucial for achieving professional-looking results with your Singer 500. Locate the corresponding dials or selectors on your machine – typically marked with numbers or length/width indicators. Experimenting with these settings allows you to tailor stitches to different fabric types and project requirements.
Shorter stitch lengths are ideal for delicate fabrics or areas requiring increased strength‚ while longer stitch lengths are suitable for basting or heavier materials. Similarly‚ adjusting stitch width alters the stitch’s coverage and appearance‚ impacting both aesthetics and functionality.
Always test your chosen settings on a scrap piece of fabric before commencing your project. Consult your Singer 500 manual for recommended settings based on fabric weight and stitch type. Mastering these adjustments unlocks the full creative potential of your sewing machine.

Advanced Sewing Techniques
Elevate your skills with buttonhole sewing‚ zipper insertion‚ and overcasting stitches on the Singer 500‚ unlocking creative possibilities and professional finishes.
Buttonhole Sewing
Mastering buttonholes with your Singer 500 requires understanding the specific settings and attachments detailed in the instruction manual. The manual provides step-by-step guidance‚ ensuring consistently neat and durable buttonholes for all your sewing projects. Begin by selecting the appropriate buttonhole foot‚ crucial for achieving professional results.
Carefully adjust the buttonhole stitch width according to the size of your chosen buttons; the manual illustrates this process clearly. Practice on scrap fabric first to refine your technique and ensure proper stitch formation. The Singer 500’s capabilities allow for both automatic and manual buttonhole creation‚ offering flexibility based on your preference and project needs.
Remember to consult the manual for troubleshooting common issues‚ such as uneven stitches or fabric puckering. Proper tension adjustment is key to a flawless buttonhole. With practice and adherence to the manual’s instructions‚ you’ll confidently create beautiful buttonholes every time‚ enhancing the quality and finish of your garments and crafts.
Zipper Insertion
Successfully inserting zippers with your Singer 500 relies on utilizing the correct presser foot – typically a zipper foot – and following the detailed instructions within the manual. The manual illustrates various zipper application techniques‚ including centered‚ overlapped‚ and invisible zipper insertions‚ catering to diverse project requirements.
Begin by pinning the zipper in place‚ ensuring it’s aligned correctly with the fabric edge. The manual emphasizes the importance of slow‚ consistent stitching‚ particularly when navigating curves or starting and stopping points. Adjust stitch length as recommended for the fabric weight and zipper type; a shorter stitch provides greater security.
Refer to the manual’s diagrams for guidance on using the zipper foot to stitch close to the zipper teeth‚ achieving a professional finish. Troubleshooting tips address common issues like uneven stitching or zipper binding. With careful attention to the manual’s guidance‚ you’ll confidently insert zippers‚ adding a functional and polished element to your sewing creations.
Overcasting Stitches
The Singer 500 manual details how to utilize overcasting stitches to prevent fabric fraying and create a neat edge finish. These stitches‚ often resembling a zigzag‚ encase the raw edge of the fabric‚ enhancing durability and aesthetics. The manual showcases different overcasting stitch widths and lengths suitable for various fabric types‚ from lightweight knits to heavier woven materials.
Proper tension adjustment is crucial for achieving a balanced overcast stitch. The manual provides clear instructions on adjusting the tension dials to prevent puckering or loose threads. It also explains how to guide the fabric evenly under the presser foot for consistent stitch formation.
Explore the manual’s illustrations to understand how to utilize the overcasting feature for both straight and curved edges. Troubleshooting sections address common issues like skipped stitches or uneven edges‚ ensuring a professional and long-lasting finish to your sewing projects.

Maintenance and Troubleshooting
Ensure longevity with cleaning‚ oiling‚ and lubrication guidance from the manual. Resolve common issues like skipped stitches using the troubleshooting section for optimal performance.
Cleaning Your Singer 500
Regular cleaning is crucial for maintaining your Singer 500’s performance and extending its lifespan. Before beginning‚ always disconnect the machine from the power source to ensure safety. Use a soft brush‚ like a paintbrush‚ to remove lint and dust from the bobbin area‚ feed dogs‚ and around the needle plate.
Pay close attention to areas where lint accumulates‚ as this can cause jams and affect stitch quality. A small vacuum cleaner attachment can also be helpful for removing stubborn debris. For the exterior‚ wipe down the machine with a slightly damp cloth. Avoid using harsh chemicals or abrasive cleaners‚ as these can damage the finish.
Specifically‚ the bobbin race requires careful cleaning; ensure it’s free of lint and oil buildup. Periodically‚ a thorough cleaning‚ including oiling (covered in the next section)‚ will keep your Singer 500 running smoothly and prevent potential mechanical issues. Consistent maintenance is key!
Oiling and Lubrication
Proper lubrication is vital for the smooth operation of your Singer 500. Use a high-quality sewing machine oil‚ applying it sparingly to the designated oiling points. Refer to your Singer 500 manual for specific locations‚ but generally‚ these include the bobbin race‚ shuttle hook‚ and any moving parts identified in the service manual.
Avoid over-oiling‚ as excess oil can attract dust and lint‚ creating a sticky residue. A few drops are usually sufficient. After oiling‚ run the machine briefly to distribute the oil evenly. Wipe away any excess oil with a clean cloth. Regular oiling‚ combined with cleaning‚ prevents friction and wear‚ ensuring longevity.
Remember to disconnect the power before oiling. Consider the frequency of use; more frequent use necessitates more frequent lubrication. Consistent maintenance‚ including both cleaning and oiling‚ will keep your Singer 500 performing optimally for years to come.
Common Problems and Solutions
Thread bunching often indicates incorrect threading or improper bobbin winding. Re-thread the machine‚ ensuring the presser foot is up‚ and rewind the bobbin‚ checking for even distribution. Skipped stitches can stem from a dull or incorrect needle; replace it with the correct type and size for your fabric.
If the machine jams‚ disconnect the power and carefully remove any tangled thread or fabric. Consult the service manual for detailed disassembly instructions if needed. Uneven stitching might be caused by incorrect tension settings; adjust the tension dial incrementally until the stitches are balanced.
Always refer to your Singer 500 manual for specific troubleshooting guidance. Remember to clean the machine regularly to prevent lint buildup‚ a common cause of malfunctions. Persistent issues may require professional servicing.

Specific Model Variations
Explore distinctions between the Singer 500 and 500A‚ alongside the modern CG500 and HD500‚ each offering unique features and capabilities for diverse sewing needs.
Discover how these models evolved!
Singer 500 vs. Singer 500A
Delving into the nuances between the Singer 500 and 500A reveals subtle yet significant differences primarily centered around cosmetic and minor functional enhancements. The Singer 500A generally represents a later production iteration of the original 500‚ often featuring updated styling elements and potentially improved internal components.
Specifically‚ the 500A frequently boasts a more refined appearance‚ with alterations to the machine’s casing and decorative features. While the core sewing mechanisms remain largely consistent‚ some 500A models may incorporate slight modifications to enhance stitch quality or operational smoothness. Finding a “Deluxe-Edition” manual caters specifically to both the 500 and 500A‚ indicating a shared operational foundation.
However‚ it’s crucial to note that these variations are often minimal‚ and both machines are fundamentally capable of performing the same range of sewing tasks. Owners of either model can generally utilize the same manuals and resources for maintenance‚ repair‚ and troubleshooting‚ as the underlying technology remains largely compatible.
Singer CG500 – A Modern Variant
The Singer CG500 represents a contemporary evolution of the classic Singer lineage‚ offering a computerized sewing experience while retaining some design cues from earlier models. Unlike the fully mechanical Singer 500 and 500A‚ the CG500 incorporates electronic controls and a wider array of pre-programmed stitch patterns.

A dedicated instruction manual for the CG500 is readily available online‚ boasting 50 pages of detailed guidance. This manual covers everything from initial setup and threading to advanced features like programmable stitch settings and automatic needle threading. While sharing the “500” designation‚ the CG500’s computerized nature necessitates a distinct manual compared to its vintage counterparts.
Users should specifically reference the CG500 manual for troubleshooting‚ as issues related to electronic components require different diagnostic approaches than those found in mechanical machines. Despite the technological leap‚ the CG500 aims to provide user-friendly operation‚ making it accessible to both beginners and experienced sewers.
Singer HD500 – Features and Differences
The Singer HD500 is a heavy-duty sewing machine designed for tackling thicker fabrics and more demanding projects. While bearing the “500” name‚ it diverges significantly from the original Singer 500 in terms of construction and capabilities. The HD500 boasts a more robust metal frame and a powerful motor‚ enabling it to sew through denim‚ leather‚ and multiple layers of fabric with ease.
A comprehensive manual for the HD500 is freely accessible online‚ currently rated 9.4 by 4 users. This manual details the machine’s specialized features‚ including its adjustable presser foot pressure and extended sewing surface. It’s crucial to consult the HD500 manual specifically‚ as its heavy-duty components and settings differ substantially from the standard Singer 500.
Users will find guidance on utilizing the HD500’s unique capabilities for projects like quilting‚ upholstery‚ and garment construction. The manual provides clear instructions on needle selection‚ thread tension‚ and stitch settings optimized for various fabric weights.
Resources and Support
Explore online forums‚ communities‚ and readily available replacement parts for your Singer 500. Contact Singer customer support for assistance and expert guidance.
Find valuable help!
Online Forums and Communities
Engage with a vibrant network of Singer 500 enthusiasts through dedicated online forums and communities. These platforms serve as invaluable resources for troubleshooting‚ sharing sewing tips‚ and discovering innovative techniques specific to your machine model. Connect with experienced users who can offer guidance on repairs‚ maintenance‚ and even locating hard-to-find parts.
Benefit from collective knowledge‚ where members frequently post solutions to common problems‚ detailed explanations of manual sections‚ and insights into specific model variations like the 500A or CG500. Participate in discussions‚ ask questions‚ and contribute your own expertise to help fellow sewing machine owners. These communities often host digitized versions of manuals and offer a space to exchange valuable information not readily available elsewhere. Explore these digital hubs to maximize your Singer 500 experience!
Finding Replacement Parts
Sourcing replacement parts for your Singer 500 can be streamlined through various online retailers and dedicated sewing machine parts suppliers. Utilize the detailed parts list found within the Singer 500 service manual to accurately identify the components you require‚ ensuring compatibility and a successful repair. Explore online marketplaces‚ often featuring a wide selection of both new and vintage parts.
Consider specialized sewing machine repair shops‚ which frequently stock common replacement parts and can offer expert advice. Remember to have your machine’s serial number handy when ordering‚ as variations exist between models like the 500 and 500A. Compare prices and shipping costs from different vendors to secure the best deal. Don’t hesitate to consult online forums for recommendations on reliable suppliers and potential alternatives.
Contacting Singer Customer Support
While the Singer 500 is a vintage machine‚ accessing support remains possible through Singer’s official channels. Begin by visiting the Singer website and navigating to their “Contact Us” section; however‚ direct support for older models may be limited. Explore their online help center‚ which contains FAQs and troubleshooting guides that might address common issues. Consider utilizing online sewing machine forums and communities‚ where experienced users often share advice and solutions.
For specific inquiries‚ you can attempt to reach Singer customer support via phone or email‚ though response times may vary. Be prepared to provide your machine’s model number and serial number. Alternatively‚ local authorized Singer repair centers can offer professional assistance and parts. Remember that independent repair technicians specializing in vintage sewing machines are also a valuable resource.